
We live in a world that is progressive. We are surrounded by people becoming dependent on innovations and automation which makes their lives easier. Each person is spending tons of money on gadgets and accessories that are putting their daily tasks at ease. For the same reason, computer scientists are using different ideas and techniques to do so such as image search, image to text, as well as speech to text functionality in different applications. In this blog, we will be learning how to use Speech to Text Recognition in a React Native Application.
What is Speech to Text Recognition? Have you ever used Alexa or Siri? If yes, have you ever wondered how do they understand your words and your voice? Your spoken words are converted into the textual format and fed into the system and then you get some sort of reply.
Go through the following steps to use the Speech to Text Recognition feature in your application:
Create React Native Application:
First of all, create a new react native application using the following command on the power shell or any command line that you use. Make sure that you have npx installed.
npx react-native init Speech2TextAfter this, set up your mobile device/ emulator for debugging purposes and install Android Studio for further usage.
Run Your Application:
Now, running our application using the following command on power shell
cd Speech2Text
npx react-native run-android 	(For Android)
npx react-native run-ios 	(For ios)
To automatically link your package, enter the following command:
react-native link @react-native-community/voiceFor ios, run the following to link the package:
npx pod-installImport Necessary Package:
Now, use the following command to import the necessary library to run the package:
import Voice from '@react-native-community/voice';Defining the State:
Defining the state of the component so that we can save the pitch, start and endpoint of the voice recording, error if any occurs, and the results as well.
    const [pitch, setPitch] = useState('');
    const [error, setError] = useState('');
    const [end, setEnd] = useState('');
    const [started, setStarted] = useState('');
    const [results, setResults] = useState([]);
    const [partialResults, setPartialResults] = useState([]);
Voice from react-native voice package contains certain events that occur which are as follows:
- Speech Start
- Speech End
- Speech Error
- Speech Results
- Speech Partial Results
- Speech Volume Change
- Speech Recognized
For each of these events, we have to declare handlers which will be called once any of the events occurs.
const  onSpeechStart = (e) => {
    setStarted('True')
};
const onSpeechEnd = () => {
    setStarted(null);
    setEnd('True');
};
const onSpeechError = (e) => {
    setError(JSON.stringify(e.error));
};
const onSpeechResults = (e) => {
    setResults(e.value)
};
const onSpeechPartialResults = (e) => {
    setPartialResults(e.value)
};
const onSpeechVolumeChanged = (e) => {
    setPitch(e.value)
};
After we have declared all the event handlers we have to attach them to the Voice Package that we have used so that they can be triggered as follow. We will do this in the useEffect() hook so that they are bind upon component mounting.
Voice.onSpeechStart = onSpeechStart;
Voice.onSpeechEnd = onSpeechEnd;
Voice.onSpeechError = onSpeechError;
Voice.onSpeechResults = onSpeechResults;
Voice.onSpeechPartialResults = onSpeechPartialResults;
Voice.onSpeechVolumeChanged = onSpeechVolumeChanged;
Now define an HTML Component in the return statement which will be used to trigger the start recognizing function. For this, in this article, we have used two different icons, one for start recording and one for stop recording
.
{!started?
            <TouchableHighlight
                onPress={ startSpeechRecognizing }
                style={{ marginVertical: 100 }}>
                    <Image
                    style={styles.button} source={{ uri:  'https://png.pngtree.com/png-vector/20190329/ourlarge/pngtree-vector-microphone-icon-png-image_889382.jpg', }} />
            </TouchableHighlight>
            :
            <TouchableHighlight
                onPress={ stopSpeechRecognizing }
                style={{ marginVertical: 100 }}>
                    <Image
                    style={styles.button} source={{ uri: 'https://preview.redd.it/axorctfsk4v01.jpg?auto=webp&s=b9f5f8c1a353bd10aa7f3fa61e24b756ff042a7b', }}/>
            </TouchableHighlight>}
As you can see there are two functions that are visible stopSpeechRecognizing and startSpeechRecognizing, these two functions are called once the user presses the start or stop button. In these two functions we trigger the package’s different functions as follows:
const startSpeechRecognizing = async () => {
        setPitch('')
        setError('')
        setStarted('')
        setResults([])
        setPartialResults([])
        setEnd('')
        try {
            await Voice.start('en-US',
                {EXTRA_SPEECH_INPUT_MINIMUM_LENGTH_MILLIS: 10000});
            } catch (e) {
            console.error(e);
            }
    };
const stopSpeechRecognizing = async () => {
        try {
        	await Voice.stop();
        	setStarted(null);
        } catch (e) {
        	console.error(e);
        }
    };
As we can see in the startSpeechRecognizing() function that we have triggered the start event of the package using Voice.start() and we have passed en-US as the first parameter so that the interpreter knows in which user will be speaking. Here we have used this for the English language. Except for this, we can see there is another parameter EXTRA_SPEECH_INPUT_MINIMUM_LENGTH_MILLIS. There is a minor issue with this package that as soon as it does not get any input, it stops recognizing. Hence to increase the delay after no input is spoken, we have used this parameter.
<ScrollView style = {styles.messageBox}>
       {partialResults.map((result, index) => {
          return (
            <Text key={`partial-result-${index}`} style={ styles.resultBox }>
               {result}
            </Text>
          ); })}
</ScrollView>
There are two types of results, one is partial results and another one is the final results. Partial results are the initially interpreted results whereas the final results are the results that are that have the most chance to be recognized with the provided input. Here, we have used both. As you can see in onSpeechPartialResults(), it sets the partial results and similarly, onSpeechResults() sets the final results in a form of an array. You can display these in a Text tag as follows or even map the results in the form of a list.
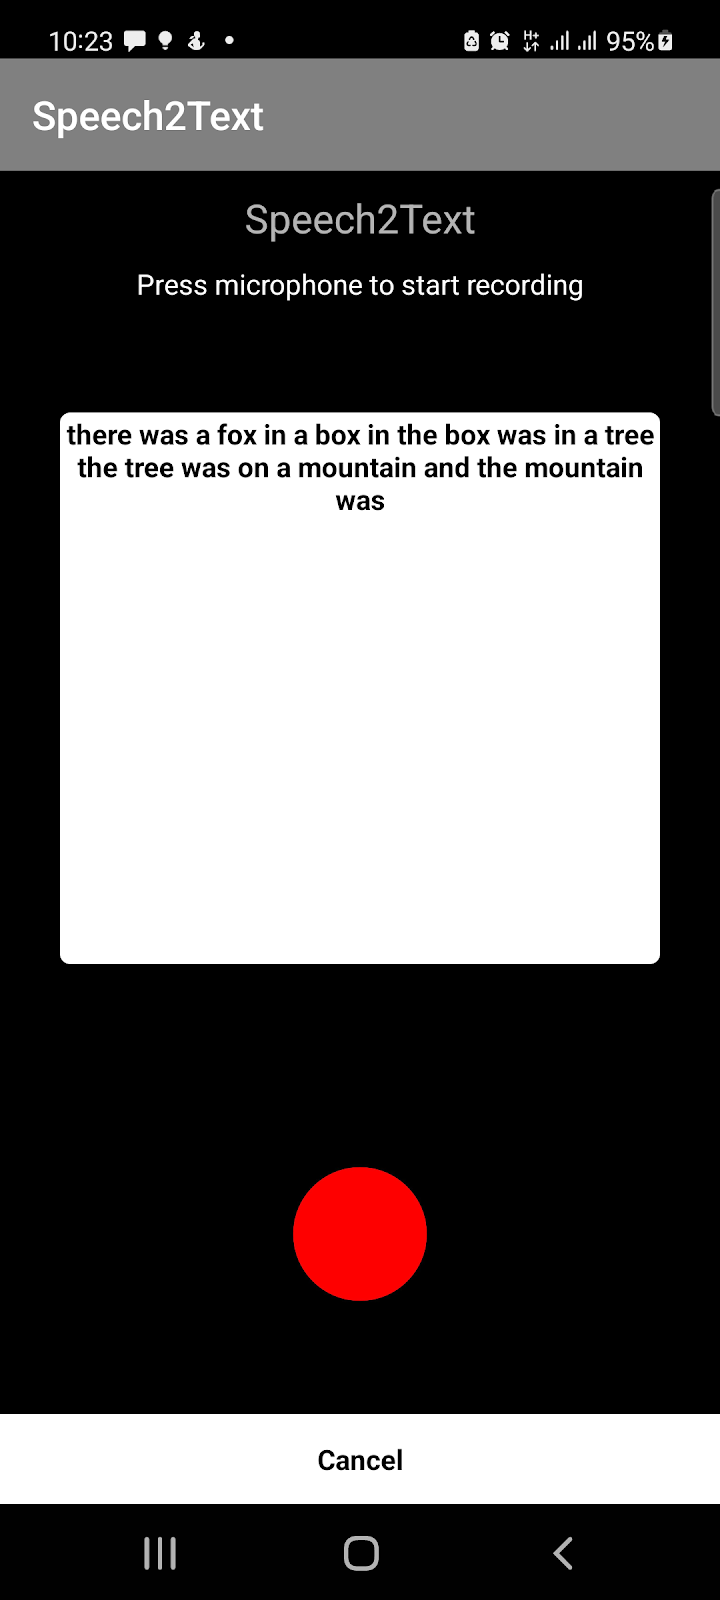
You can define these styles using StyleSheet.create() function and define all your custom styles there. Here is the screenshot of the final result:

Do you know any other way? Do let us know in the comments.