


How to secure mobile app credentials using React Native key-chains?
Businesses prioritize robust security at all levels, mainly around customer data. And they are extra vigilant in the case of mobile applications.
With the growing rates of mobile usage, almost every business offers a mobile application these days to connect with their customers promptly. And if the security is compromised with these apps, it can be strongly detrimental to their brand.
Since there are quite a many operating systems, managing the mobile security can be difficult owing to the different configurations. A survey backs this argument by claiming that over 75% of mobile apps can’t pass the basic security tests. And this is quite concerning.
Most people install the applications from the online stores to access the enterprise assets or perform various functions. Sadly, these apps offer weak security, making them vulnerable to attacks.
If you wish to safeguard your business from this menace, you must ensure the following checklist.
- Use a PIN, pattern, or password
- Biometric verification like a fingerprint or a face id
In this article we will explore how to secure the credential storage in mobile devices using react-native-keychain library.
Why we need a Keychain?
By default, React-Native does not come bundled with any method of storing secure data.
But, there are two separate existing solutions for Android and iOS, which are,
- iOS Keychain service
- Android Secure Shared Preferences
To use these two services, either you can write a bridge by yourself or more quickly you can use libraries.
The react-native-keychain library provides keychain/key store access to your React Native application, making your application secure.
First and foremost, we can start by installing the react-native-keychain in our React-Native project.
Installing packages
Run the following command:
You can use either npm or yarn to install the package.
npm i react-native-keychain
yarn add react-native-keychain
Make sure to link your library:react-native link react-native-keychain
You can verify if the linking was complete by making sure that the library was added to the MainApplication.java.
If you are developing iOS, Run pod install in the ios/ directory to install iOS dependencies.
Now, you are ready to rebuild your application.
react-native run-ios
react-native run-android
Once the above steps are complete, you are all set to start using the react-native-keychain library within your app.
Using the library in practice
Step# 1 – Check supported Biometric Type
This function can be used to check the phone’s hardware biometry that is supported. It works for both Android and iOS devices.


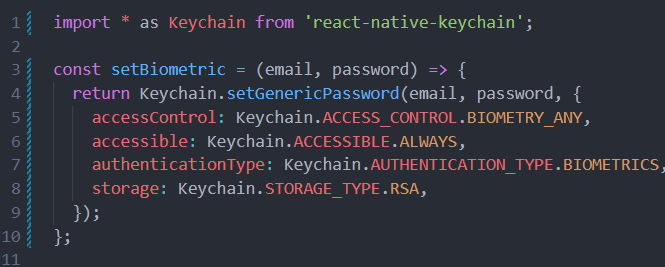
Step# 2 – Set Biometric
This function will store the username/password combination in the secure storage. It resolves to true or reject in case of an error scenario.

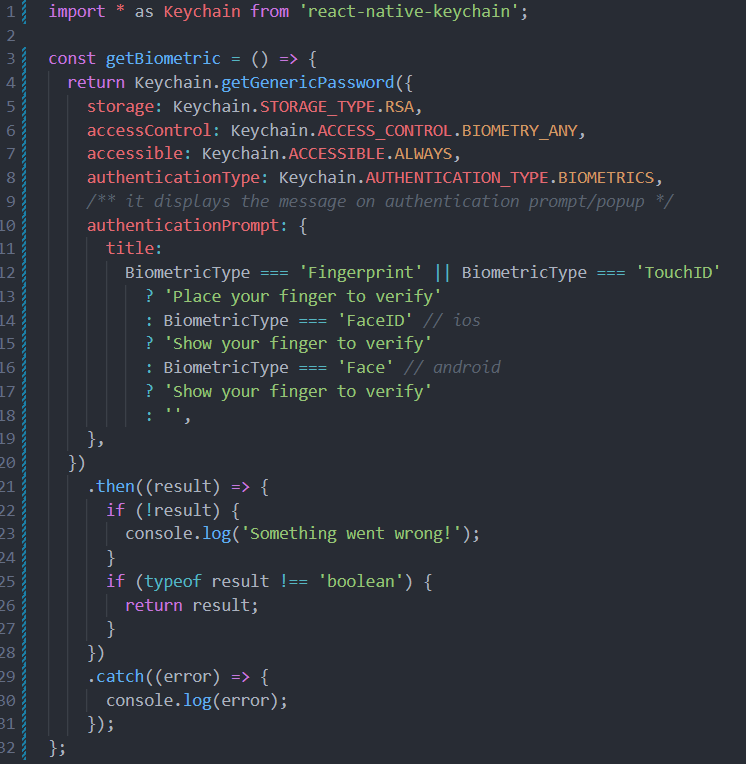
Step# 3 – Get Biometric
This function retrieves the credentials from the secure storage.
(Note: By default, the function returns String. So when retrieving objects, it is recommended to use JSON.parse).

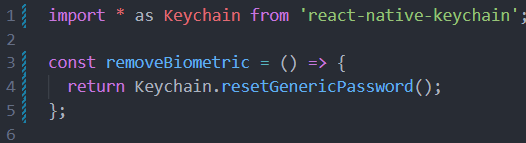
Step# 4 – Remove Biometric
This function as the name suggests will remove the credentials from the secure storage completely and reset it.

Benefits of using react-native-keychain
- One library to access both iOS Keychain and Android Keystore in React-Native apps.
- There are many reasons why react-native-keychain is the most popular library.
- Let us look at some significant pros.
- The device must be unlocked to access the Keychain.
- The Keychain cannot be restored to a different device.
- In never devices, the encryption keys are stored on the hardware level.
Conclusion
Based on my experience, as I have shown above, using a react-native-keychain is the best option to store credentials and use biometrics in React-Native mobile apps. As I can see, the main advantage is that the usage of the existing iOS Keychain and Android shared preferences under the hood.
I hope the approach discuss here is helpful for most of you. Thank you for reading.
Detailed Example
For a more detailed example, check out the example from the library here: