


Introduction
This blog will teach us to build a BDD web UI test automation suite using Pytest-BDD. Pytest-BDD is a test framework for enabling behavior-driven tests in Python. Unlike many other BDD tools, with Pytest-BDD, we do not need a separate runner file; it also inherits the power and flexibility of Pytest. But before getting started with Pytest-BDD, let us look at what BDD is and why we need it.
BDD
Behavior in software describes how a feature responds or behaves when the user performs a scenario. It captures a set of inputs, performed actions, and expected outcomes. Behavior-driven development (BDD) is a methodology for developing software or tests where the behavior of the software is put first and then the development is done accordingly.
Why should we use BDD?
- Separating individual behaviors of software helps us understand the system without any complications
- Overcomes the communication gap between technical and non-technical teams
- Improves planning
- Comprehensive development for automated tests
- Improves documentation
- Makes the framework more scalable
- Reusability
Prerequisites
- Python
As we know selenium supports a set of programming languages but here are the reasons to use Python over any other programming language with Selenium.
- Comparatively, python minimizes the time to run the script, furthermore curtailing the time of execution
- The code flow of Python is understandable as it uses indentation instead of braces in the initiation and end blocks.
The current supported Python versions are 3.5 and above.
- Selenium
Selenium is a free (open-source) automated testing framework used to validate web applications across different browsers and platforms.
- Selenium supports a set of programming languages to work with.
- It also supports a set of different browsers though cross-browser testing can be easily achieved.
- It supports parallel execution.
- Provides easy integration with CI/CD and reporting tools.
- It has a mature online community.
For selenium installation, you can use the pip command.
pip install selenium- Pytest
Pytest is a mature and extensive Python testing framework we can use with Selenium to write our automated tests. Using Pytest, we can also define the code we need to run before and after the test execution just like TestNG.
- Pytest has a way of auto-discovering test modules and functions.
- It provides detailed info on the assert statements.
- Supports parallel execution
- Provides support for defining the order of test execution, skipping a test, or executing a subset of a test suite
We can install Pytest using the pip command.
pip install -U pytestPytest-BDD
Pytest-BDD is a plugin for pytest, which is one of the best test frameworks in Python, and also one of the most popular. Pytest makes it very easy to write simple but powerful tests. It also comes with a bunch of other plugins such as code coverage, HTML reports, or parallel execution and all the pytest plugins are fully compatible with pytest-bdd. We can use conftest fixtures similar to pytest to manage context between functions.
Installation
We install pytest-bdd using the following pip command.
pip install pytest-bddConventions
Similar to the convention of pytest, our test files should be named as test_*.py or *_test.py files and all the test items in those files should use
- Test prefixed test functions or methods outside of class-test prefixed test functions or methods inside
- Test prefixed test classes (without an __init__ method)
But, in this case, our test files will be our step definition files (representatives) of our feature files in the BDD framework. Those files will contain the test code of our gherkin feature files.
Project
      |_ Pages
            |_ *page.py
      |_ Test
            |_ features
                      *.feature
                        |_ steps
                                |_ test_step_defs.py
Writing a Test
Referring to the folder hierarchy above, we have created a directory named features that will hold our feature files and a directory for step definition files named steps. We will provide the path for a feature file in a scenario defined in a step definition file. Other names and hierarchies may be used. For example, large test suites can have feature-specific directories of features and step defs. pytest should be able to discover tests anywhere under the test directory
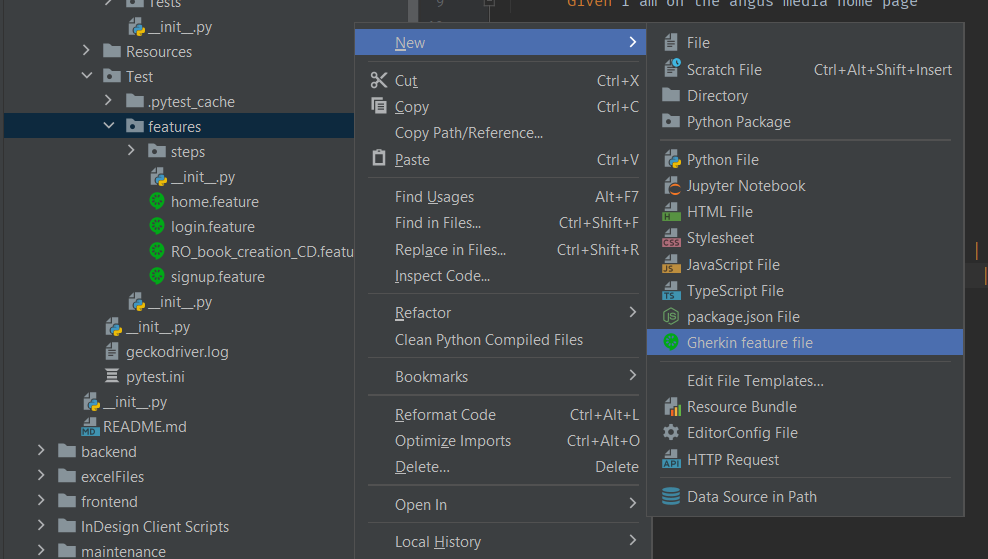
Creating a feature file
- Right-click on the desired directory and create a new Gherkin feature file.
- Write your Gherkin scenario(s) in the feature file.


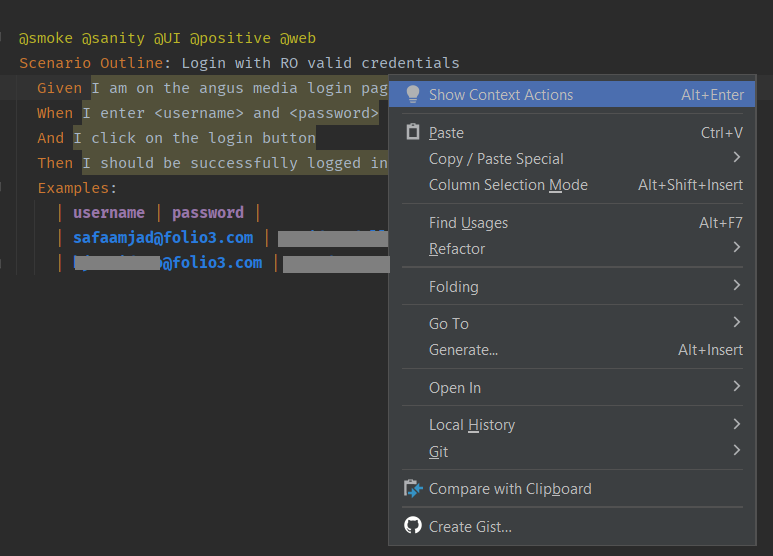
The step statements highlighted by IDE show that no step definition is available for this gherkin.
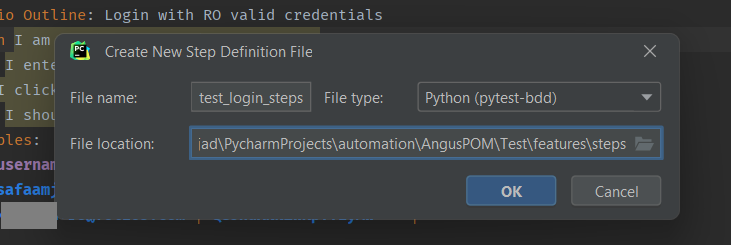
Create a Step Definition File
- Right-click on the step statement.
- Click on Show Context Actions.
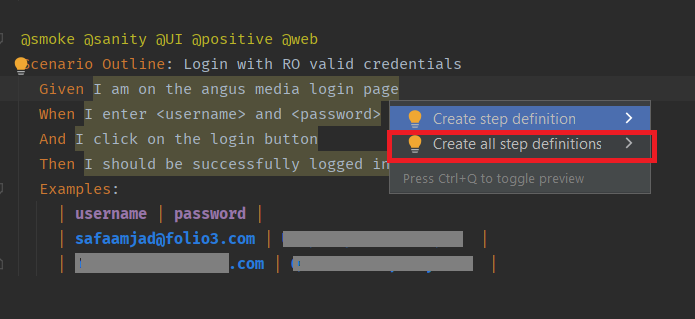
- Click on Create all step definitions if you want to create all step definition methods at once. Otherwise, you can also create a single-step definition method with ‘Create step definition’
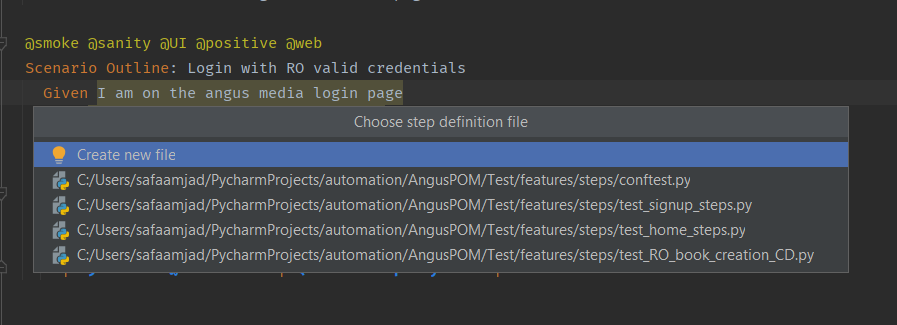
- Click on Create a new file


A python file will be created at the specified location with all the step definition methods.


from pytest_bdd import scenario, given, when, then

@given("I am on the angus media login page")
def step_impl():
  raise NotImplementedError(u'STEP: Given I am on the angus media login page')


@when("I enter <username> and <password>")
def step_impl():
  raise NotImplementedError(u'STEP: When I enter <username> and <password>')


@given("I click on the login button")
def step_impl():
  raise NotImplementedError(u'STEP: And I click on the login button')


@then("I should be successfully logged in")
def step_impl():
  raise NotImplementedError(u'STEP: Then I should be successfully logged in'
5. Implement the logic for each step
@given("I am on the angus media login page")
def navigate_to_login_page(browser):
  try:
     HomePage(browser).navigate_to_login()
     assert LoginPage(browser).check_login_button_enabled() == True
  except:
     raise Exception('Navigation to login failed')
“browser” passed in each step definition method is the fixture defined in the conftest file.
Note: In this case, we do not need to use the annotation pytest.mark.fixture as we use in pytest.
@pytest.fixture
def browser():
    opts = webdriver.ChromeOptions()
    opts.add_argument('start-maximized')
    opts.add_argument('headless')
    b = webdriver.Chrome(ChromeDriverManager().install(), options=opts)
  yield b
  b.close()
b.quit()- Write a test method as suggested by pytest in the step definition file to execute the test. Specify the feature file path we need to refer to and the scenario we want to execute.
@scenario('../login.feature', 'Login with RO valid credentials')
def test_login():
  pass


@when(parsers.parse('I enter {username} and {password}'))
def enter_username_and_password(browser, username, password):
  try:
     base64_bytes = password.encode("ascii")
     string_bytes = base64.b64decode(base64_bytes)
     n_password = string_bytes.decode("ascii")
     LoginPage(browser).enter_credentials(username, n_password)
  except:
     raise Exception('Entering credentials failed')
Invoking the tests
If you execute the command pytest in the step directory, It will invoke all of the test files. For running a single test file and all the test methods it contains, we use this command.


And for running a specific test function, we do it this way

The test result and execution time will be shown like this in the terminal.


Parameterization
Variables in Gherkin can be parametrized in step definition methods in the following way.
@when(parsers.parse('I enter {username} and {password}'))
def enter_username_and_password(browser, username, password):
  try:
     base64_bytes = password.encode("ascii")
     string_bytes = base64.b64decode(base64_bytes)
     n_password = string_bytes.decode("ascii")
     LoginPage(browser).enter_credentials(username, n_password)
  except:
     raise Exception('Entering credentials failed')
username and password written in curly brackets are passed as parameters in the step definition method and the values will be picked by the table defined in the example of the scenario outline in the feature file.
@login
Feature: LogIn
   As a test automation engineer,
   I want to login into the angus media application,
   So that I can verify the login functionality


 Background: Angus Media Home
       Given I am on the angus media home page


 @smoke @sanity @UI @positive @web
 Scenario Outline: Login with RO valid credentials
   Given I am on the angus media login page
   When I enter <username> and <password>
   And I click on the login button
   Then I should be successfully logged in
   Examples:
     | username | password |
     | safaamjad@folio3.com | password_1  |
     | johndoe@folio3.com | password_2  |
Shared Steps
We can define a common precondition for scenarios as a given step in the Background. This shared step can be defined in a conftest file and will be executed before each test scenario.
Tagging
Tagging in BDD is a way to categorize your scenarios. We can also provide a tag to a feature and this way all the scenarios in a feature will be automatically tagged with the given tag.


In Pytest-BDD, we can invoke our tests by passing tags in the pytest command and only those scenarios related to the given tag will be executed.

We provided a tag @signup to the feature. All the scenarios in the feature will be executed with the following command.

To avoid the pytest warning, we also need to define our tags in the pytest.ini file stored in the root directory of the project.
[pytest]
markers =
   smoke: for running smoke test cases
   sanity: for running sanity test cases
   regression: for running test cases in the regression suite
   positive: for running only happy scenarios
   negative: for running negative scenarios
   UI: for test cases related to web UI
   book_creation_cd: for custom design book creations
   home: for test cases related to the home page
   login: for test cases related to the login page
   signup: for signup scenarios
   serial
Thanks for reading, Don’t forget to share your thoughts in the comment section!