


In this blog, we are going to learn how can we draw an image and write text on HTML5 canvas element using React.
Wait! What is Canvas?
It’s an HTML element that is used to draw graphics on a web page. The element is only a container for the graphics; we use JavaScript to actually “draw” the graphics onto the canvas.
Basic setup!!!
We’ll start by creating a new React app using create-react-app. Just create a new folder and open your terminal there and type following commands
> npx create-react-app canvas-on-react
> cd canvas-on-react
> npm start
Your browser should open http://localhost:3000/ and you should see a spinning React logo. You’re now ready to go!
Let’s get started:
Open the file src/App.js in your favorite editor and replace the contents with the following code:

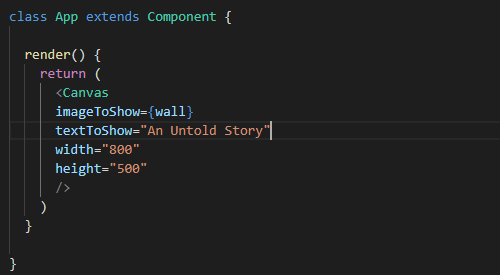
Here, I have imported and rendered my custom Canvas component which I will show you later.
I am passing some props to my Canvas component
– imageToShow: This will be the image you want to draw inside canvas
– textToShow: Text which you want to show inside that image
– width: width of canvas
– height: height of canvas
The Canvas Component:
There are two main elements inside this component, the image element, and the canvas element.

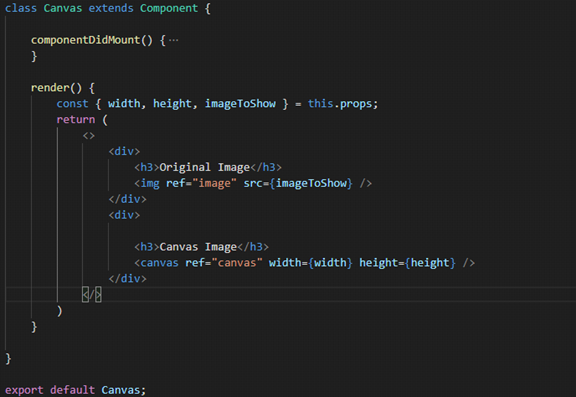
Both elements have a ref attribute. This is how we’ll access the elements later on. (If we were using plain JavaScript, we could do something like document.getElementById(“canvas”). Since we’re using React, we need another way to access the elements.)
We want to draw the image on canvas on mounting phase. For that purpose, we are going to use REACT lifecycle hook “ComponentDidMount”.
You need to insert the following line of code inside ComponentDidMount lifecycle and you are good to go.

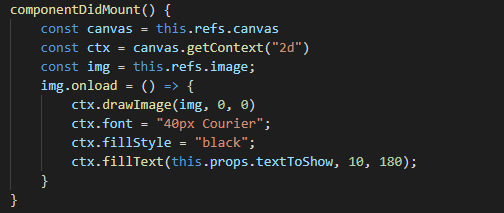
Let’s walk through those new lines of code:
First, find the <canvas> element and save it to a variable.
const canvas = this.refs.canvas
Create a drawing object for our canvas and save it to a variable. This drawing object is what we’ll actually be drawing on.
const ctx = canvas.getContext(“2d”)
Find the <img> element and save it to a variable.
const img = this.refs.img
After saving the reference of all the elements, its time to draw our canvas.
Firstly, use image onload event to wait and start drawing after the <img> element has finished loading.
img.onload = () => {…}
Then use the drawImage(image,x,y) method to draw our image starting at the top left corner of the canvas. The drawImage takes 3 parameters.
1. Image to draw
2. X-axis position
3. Y-axis position
ctx.drawImage(img, 0, 0)
This will draw the image on the canvas. Now its time to insert some text into it.
Setting the font properties for the text we are about to draw using the font method.
ctx.font = “40px Courier”
Lastly fill the text by ,
ctx.fillText(this.props.text, 10, 180)
Here we are using the fillText(text,x,y) method to draw our text. (As you can see, we’re getting our text from the props that were passed down from the parent component. In this example, this.props.text is “An untold story”).
Final Result:

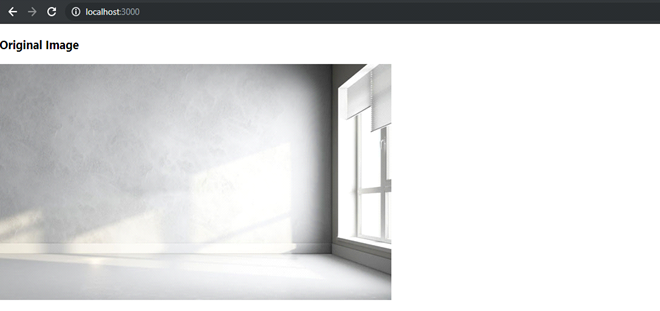


You can see you now have one “single graphic element” on your web page. All you need is just to use this canvas component anywhere!!
If you want to save this canvas on some server , you can turn it into a dataURL by this single line of code
const dataURL = canvas.toDataURL()
The result is a 64 bit encoded PNG URL which you save on any server. When you want to display the image on a web page, the string becomes the src of your <img> element.
For example, let’s say we just retrieved this long data URL string from a database or wherever and saved it in a variable called image. The JSX to display the image would be:
<img src={image} />
Wrapping Up:
You can do many things using the HTML5 canvas element. I made this blog so that you have an idea that how we can use it and integrate it into any REACT application.