

What is NgRx
Before getting to know NgRx we need to know about Redux, Redux is a design pattern that encapsulates all application data in a single javascript object, providing a consistent global data state at all times, this method is most used in react apps but it can also be applied to angular apps with a library called NgRx which uses Redux core principles with RxJs library under the hood. In this article, we are gonna cover the basics of Redux and then we’ll create an angular app from scratch using NgRx. Let’s start by looking at the core principles of Redux.
Key concepts
- Actions
- Reducers
- Selectors
- Store
Actions:
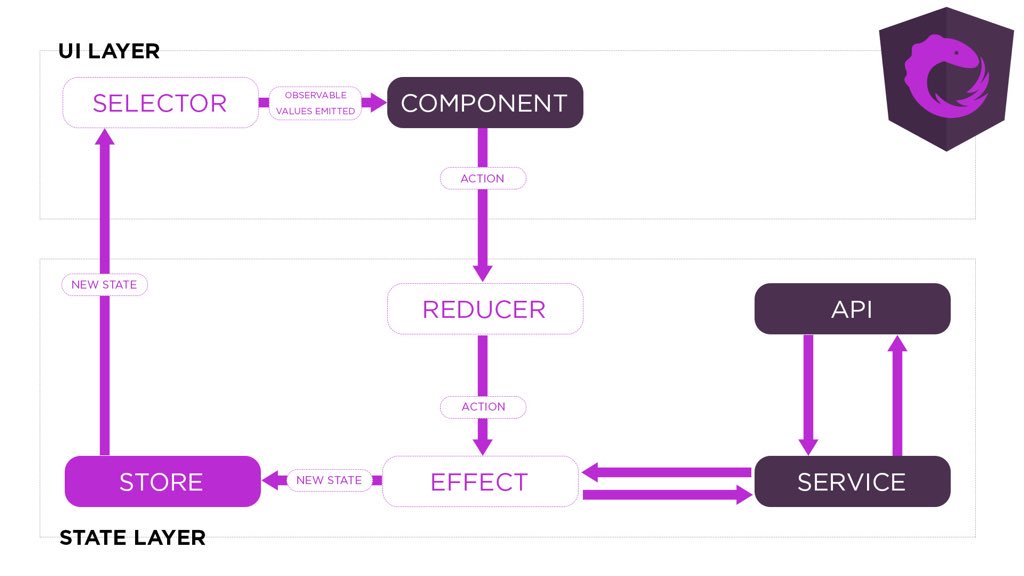
So we have a user interface that is displaying some data. Then the user performs an action that will change the state of the data in redux. The only way to change the state is by dispatching an action.


Reducers
Once an action has been dispatched then this action will be used by a reducer function which will copy the current state of the application along with any data changes to a new javascript object. It’s very essential to know that the state is immutable, meaning it can’t be changed directly; it has to be copied over to a whole brand new state. The reason for this is that it provides a predictable tree of state changes that can be used to debug an application, which is Redux’s primary benefit.


Store
Once the reducer has created the new state, it is saved in a data store..


In NgRx we treat this data store as an observable so we can subscribe to it from anywhere in the application This means that all of our components and services will be sharing the same data at any given point in time.
Selector
Selector function pick the desired piece of data from store and reflect the data on the UI


Now let’s start building a brand new NgRx app. The app will add/remove an article and the article will contain only id, title and its content. Following will be the article.interface.ts file we will be using in our app.
article.interface.ts
export interface Article {
  id: number;
  title: string;
  content: string;
}
Create a new Angular application
ng new NgRxApp
Then install NgRx Store
npm install @ngrx/store --save
Create a new file named article.actions.ts in which we will list out action-functions with required props(arguments). The actions are add and remove, first import createAction from ngrx store, create action takes the action argument and props.
article.actions.ts
import { createAction, props } from '@ngrx/store';
import { Article } from '../models/article.interface';
export const ADD_ACTION = '[Article Component] Add';
export const REMOVE_ACTION = '[Article Component] Remove';
export const addArticle = createAction(ADD_ACTION, props<{ article: Article }>());
export const removeArticle = createAction(REMOVE_ACTION, props<{ id: number }>());
Create a new file named article.reducer.ts, then define a reducer function to handle changes in article state based on provided value, first import createReducer from ngrx store, in reducer we will handle the add action by appending article collection with new article, then handle remove action by filtering out the article with its id. In the reducer function, return two properties, one in which we return the previous state like this …state and second one will contain a modified state.
For example:
  on(addArticle, (state, { article }) => {
    return {
// copying previous state
      ...state,
// create new state by appending newly created article obj in article array
      articles: [...state.articles, article]
    };
  }),
article.reducer.ts
import { createReducer, on } from '@ngrx/store';
import { Article } from '../models/article.interface';
import { addArticle, removeArticle } from './article.actions';

export const initialState: {articles: ReadonlyArray<Article>} = { articles: []};

export const articleReducer = createReducer(
  initialState,
  on(addArticle, (state, { article }) => {
    return {
      ...state,
      articles: [...state.articles, article]
    };
  }),
  on(removeArticle, (state, { id }) => {
    return {
      ...state,
      articles: state.articles.filter((article) => article.id !== id)
    };
  }),
);
Create a new file named article.selector.ts, now, to make sure we get the right data from the store. createFeatureSelector function for getting the piece of data from the store in this case its articles. Now use createSelector to return articles array.
article.selector.ts
import { createSelector, createFeatureSelector } from '@ngrx/store';
import { Article } from '../models/article.interface';

export const selectArticles =
createFeatureSelector<{articles: ReadonlyArray<Article>}>('articles');

export const selectArticlesCollection = createSelector(
  selectArticles,
  (state) => state.articles
);
Now that we are done with essential parts to build our app, let’s create a component named article in which we will add and remove the article.
Let’s register our reducer in StoreModule in app.module.ts
app.module.ts
import { NgModule } from '@angular/core';
import { BrowserModule } from '@angular/platform-browser';
import { StoreModule } from '@ngrx/store';
import { AppRoutingModule } from './app-routing.module';
import { AppComponent } from './app.component';
import { articleReducer } from './article/store/article.reducer';
import { ArticlesComponent } from './article/components/articles/articles.component';
import { ReactiveFormsModule } from '@angular/forms';

@NgModule({
  declarations: [
    AppComponent,
    ArticlesComponent
  ],
  imports: [
    BrowserModule,
    AppRoutingModule,
    ReactiveFormsModule,
    StoreModule.forRoot({ articles: articleReducer }),
  ],
  providers: [],
  bootstrap: [AppComponent]
})
export class AppModule { }
Import store to inject store service in component, we will use the store for dispatching our action and will also gonna use to select articles from the store with our selector function to display on UI,
Property `articles$` is an observable that will always contain the updated articles list from the store,
`store.dispatch` to perform actions to change the state of the app, dispatch function will take action as an argument.
article.component.ts
import { Component, OnInit } from '@angular/core';
import { FormBuilder, Validators } from '@angular/forms';
import { Store } from '@ngrx/store';
import { Article } from '../../models/article.interface';
import { addArticle, removeArticle } from '../../store/article.actions';
import { selectArticlesCollection } from '../../store/article.selectors';

@Component({
  selector: 'app-articles',
  templateUrl: './articles.component.html',
  styleUrls: ['./articles.component.css']
})
export class ArticlesComponent implements OnInit {

  public articles$ = this.store.select(selectArticlesCollection);

  public articleForm = this.fb.group({
    title: (['', Validators.required]),
    content: (['', Validators.required])
  });

  constructor(private store: Store, private fb: FormBuilder) { }

  ngOnInit(): void {}

  onAdd() {
    const article: Article = {id: new Date().getTime(), ...this.articleForm.value};
    this.store.dispatch(addArticle({ article }));
    this.articleForm.reset();
  }

  onRemove(id: number) {
    this.store.dispatch(removeArticle({ id }));
  }
}
article.component.html
<form [formGroup]="articleForm">
  <h3>Add Article</h3>
  <input [formControlName]="'title'" type="text" placeholder="Title"><br><br>
  <textarea [formControlName]="'content'" cols="30" rows="10" placeholder="Content"></textarea><br><br>
  <button type="submit" (click)="onAdd()" [disabled]="!this.articleForm.valid">Save</button>
</form>

<ng-container *ngFor="let item of articles$ | async; let i = index">
  <div>
    <p><b>Article no.</b> {{i +1}}</p>
    <p><b>Title:</b> {{item.title}}</p>
    <p><b>Content:</b> <br>{{item.content}}</p>
    <p><button (click)="onRemove(item.id)">Remove article</button></p>
  </div>
  <hr>
</ng-container>
Application snap:


What’s next?
In the future, we will be exploring NgRx Effects to handle HTTP requests to manage state from data coming from the server, until then… Take care. See you in the next blog.