
Unity3d has always amazed its fans by introducing features that enable game developers to build games with minimal effort. Most developers weren’t happy with the GUI support that Unity used to provide, till Unity unveiled their new Canvas UI. In this post we’ll take a quick look at the new Canvas UI and how you can use it to create dynamic scrollable lists.
Unlike Unity’s old GUI system, the Canvas UI allows you to build almost anything you want, using customizable buttons, natural scrolling effects, complex list structures or any other effect you like. As such, Canvas UI makes it very easy to build beautiful interfaces for games with minimal effort.
As you know, scrollable lists are the building blocks of the user interface used in most mobile games today. They come into play when you need to show large amounts of data on a small screen, for e.g. when choosing your player from a list of characters, or displaying a list of high scores, or displaying a list of store items with tens of hundreds of products. With the Canvas UI, Unity, has provided a host of components that enable you to create beautiful scrollable lists.
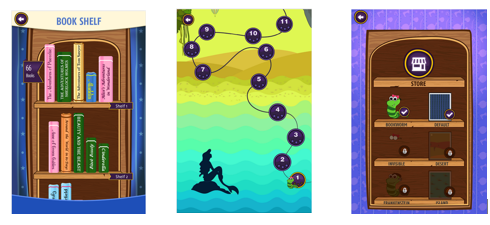
To get a sense of what you can be achieve within minutes by using this new feature, have a look at the below screenshots of some sample scrollable lists or play with them here.
In this post we’re going to create a scrollable list (or view) that will show a list of animal characters. Each animal will have three components, an image, a title and a few characteristics such as power, attack, venom etc. Each animal will be a separate list item.
To populate this list on runtime, we’ll need to create a prefab for our list items which will be instantiated based on the number of objects in our data source.
To create this list we will be using the following components:
First, we’ll select a background image to display behind our list of items, in order to avoid the ugly looking background color of our camera. The background image we’ll use is 1536 x 2048 in size and the camera is adjusted to size 10 so that it nearly fits this background. Now, drag a background image of your choice to Unity’s Assets folder, and then drag it to the object hierarchy from the assets folder.
Adding a Canvas to the Scene
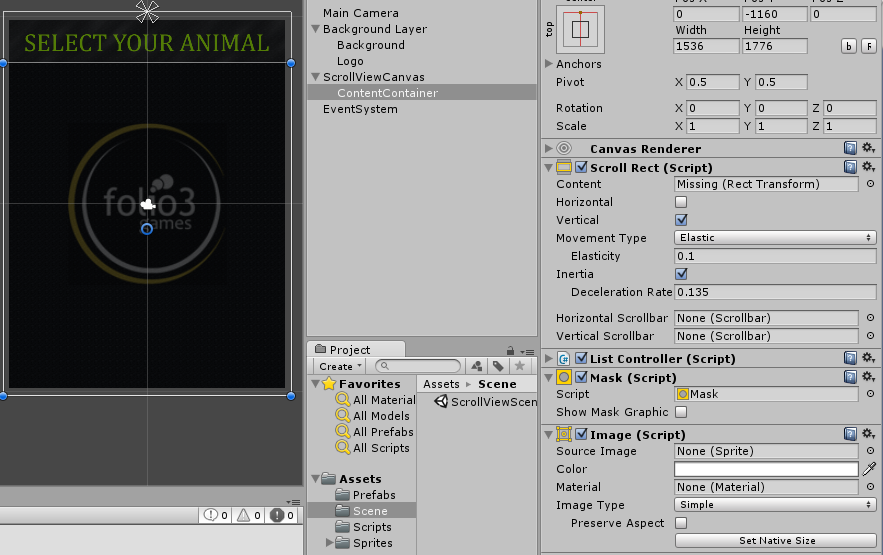
For those of you who don’t know, a canvas in Unity basically refers to the abstract space where all the UI is laid out and rendered. It is where we’ll setup our interface by adding our UI elements. Keep in mind that all the UI elements you add must be child objects of the canvas. To add a canvas to your scene, select GameObject -> UI -> Canvas from the file menu
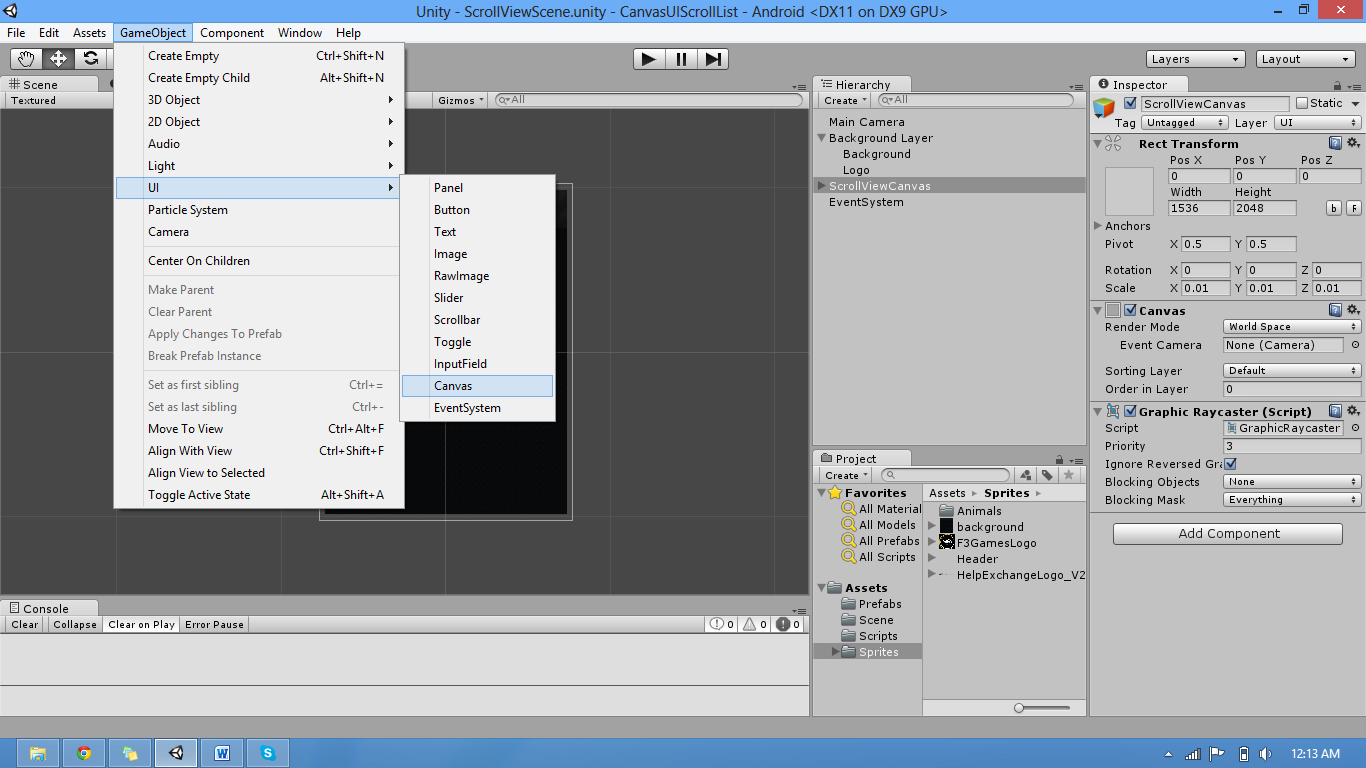
When you do that you’ll notice that the canvas appears in your hierarchy, but not at the right position and size. This is because the default render mode for the camera is screen space overlay, whereas we want it to be world space, so that we can scale and resize it according to our background. So we need to resize our canvas. First, scale it down to 0.01 on both the x-axis and y-axis, to match the pixel to unit ratio (100) of our background images. Then set its dimensions equal to the dimensions of the background used, which in our case is 1536 x 2048. Make sure the canvas fits your image as shown in the screenshots below.
To learn more about different render modes, have a look at the unity documentation, the section for Canvases describes in detail the various render modes it offers and their uses.
Adding Scroll Rect and Mask
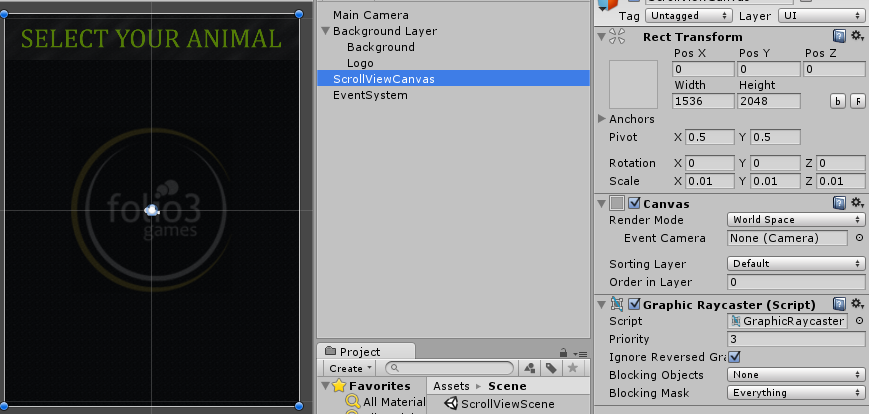
As I explained earlier, the Scroll Rect is basically a component attached to a UI element that allows other UI elements to move along its vertical or horizontal axis. To add a scroll rect, first right click the canvas object in the hierarchy to add an empty panel, move to the UI menu option and select the Panel option (as shown below).

Now to add scroll rect to the panel, select Panel in the hierarchy, click Add Component in the inspector, search for scroll rect in the UI section and select it. Now, uncheck the horizontal property of the scroll rect, we do not want to use horizontal scrolling in our vertical list. The content property is a reference to the object, which will be added as a child to this panel and will contain our animal characters.
To restrict the rendering of content within the bounds of the scroll rect, add a mask component to this panel and uncheck its Show Mask Graphic property. This mask requires an image component to be attached to the same game object.
By default, the panel comes with an Image component added to it. The default image component attached to the panel may have a background source attached to it. If this is the case, our dynamic scrolling list or view wont’ look as good; so set the Source Image property of this component to None.
Now let’s adjust the height of the panel so that it just starts below the heading as depicted in the image below.
Adding the Vertical Layout Group
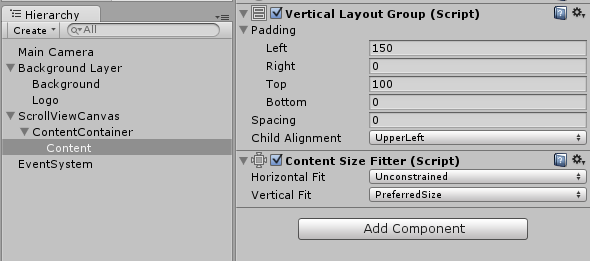
Now we’ll add the Vertical Layout Group. To do that first add an empty panel as a child to the scroll rect panel you just added to your scene and drag its reference to the parent container’s content property. The new panel will now be allowed to move along the vertical axis.
Next, add a Vertical Layout Group component to the new panel and set the top and left padding to 100 in order to give it a nice look. The default behavior of this component is to adjust the heights of objects added as child objects, so that they fit in the height of their parent container. To overcome this undesired behavior, add a Content Size Filter and set its Vertical Fit property to ‘preferred size’. This will allow the size of parent container to increase dynamically as more elements are added to it.
Creating the List Item Prefab
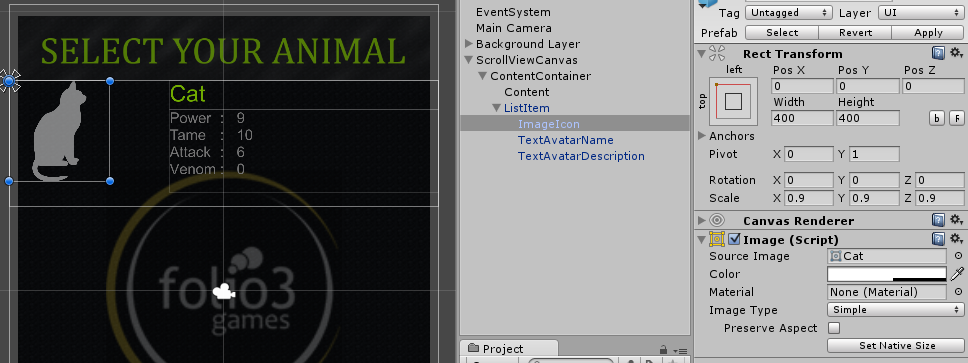
Now let’s create the List Item Prefab. Since we’ll be instantiating our list item on runtime, we’ll need to create a prefab for our list item. The list item will contain a panel, as a parent to an image for our character, a text field for the title and a text field for characteristics.
First, create a panel somewhere in your hierarchy but out of the vertical layout group, since the vertical layout group overrides the width and height properties of its child objects. So once we have our layout for the list item, after creating the prefab, we will remove the object from our scene.
Next, set the panel’s width to 1536 and height according to the content such that it covers the content inside. Add three child objects to the panel to show the data as depicted below.
To create a prefab, either drag and drop your list item object into your assets folder, or select, Assets -> Create -> Prefab from the file menu and then drag the list item object to new empty asset. Typically, the vertical layout group doesn’t work well with complex structures such as our list item, and overrides their rect transform properties. To make sure that your settings work, i.e. the width and height of the list item remains the same during gameplay, you will need to add the component Layout Element, which will allow your settings to persist.
To add the layout element component, select your prefab in the project window and click on Add Component and search for Layout Element in the Layout section. Check the Preferred Height property and set its value as equal to the height of the list item being shown in the Rect Transform.

Once you’ve done all of the above to set our scene, you’ll need to add the dynamic part. We basically need two scripts for this, one for the list that will get the data and instantiate the list items, and the other for the list item prefab so that we can get references to the UI elements. In addition, we’ll also write a third script for our convenience, that will act as a model to our data source.
The Animal Class
The following is a simple class that will work as the data model for our data source. This class basically contains the data for the image of an animal, its title and characteristics (depicted below).
public class Animal {

	public Sprite Icon;
	public string Name, Description;

	public Animal(Sprite icon, string name, string description){
		Icon = icon;
		Name = name;
		Description = description;
	}
}
The List Item Controller
This class will be attached as a component to our list item prefab. All references to our game objects will be accessed using this component, in order to set their data at runtime.
public class ListItemController : MonoBehaviour {

	public Image Icon;
	public Text Name, Description;

}
Now, attach the above script to your list item prefab by selecting prefabs in the project window. Once attached, reference the game objects by dragging and dropping objects to their respective fields (as depicted below).

The List Controller
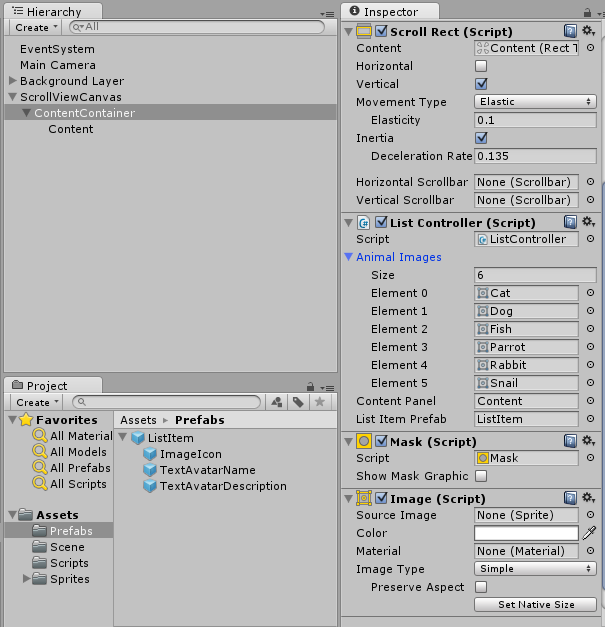
This class will be attached as a component to our list and will contain references to our prefab and the panel, for adding newly instantiated objects. For the sake of simplicity I’ve kept the references to the animal thumbnails in the same class and have created a temporary list of data to work with (shown below).
public class ListController : MonoBehaviour {
public Sprite [] AnimalImages;
public GameObject ContentPanel;
public GameObject ListItemPrefab;
ArrayList Anmimals;
void Start () {
// 1. Get the data to be displayed
Anmimals = new ArrayList (){
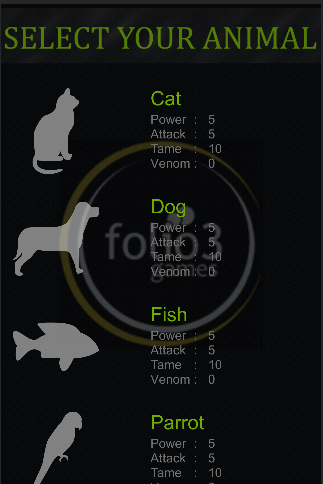
new Animal(AnimalImages[0],
"Cat",
"Power\t:\t5\nAttack\t:\t5\nTame\t:\t10\nVenom\t:\t0"),
new Animal(AnimalImages[1],
"Dog",
"Power\t:\t5\nAttack\t:\t5\nTame\t:\t10\nVenom\t:\t0"),
new Animal(AnimalImages[2],
"Fish",
"Power\t:\t5\nAttack\t:\t5\nTame\t:\t10\nVenom\t:\t0"),
new Animal(AnimalImages[3],
"Parrot",
"Power\t:\t5\nAttack\t:\t5\nTame\t:\t10\nVenom\t:\t0"),
new Animal(AnimalImages[4],
"Rabbit",
"Power\t:\t5\nAttack\t:\t5\nTame\t:\t10\nVenom\t:\t0"),
new Animal(AnimalImages[5],
"Snail",
"Power\t:\t5\nAttack\t:\t5\nTame\t:\t10\nVenom\t:\t0")
};
// 2. Iterate through the data,
// instantiate prefab,
// set the data,
// add it to panel
foreach(Animal animal in Anmimals){
GameObject newAnimal = Instantiate(ListItemPrefab) as GameObject;
ListItemController controller = newAnimal.GetComponent();
controller.Icon.sprite = animal.Icon;
controller.Name.text = animal.Name;
controller.Description.text = animal.Description;
newAnimal.transform.parent = ContentPanel.transform;
newAnimal.transform.localScale = Vector3.one;
}
}
}
Attach the above script to your list (the panel to which the Scroll Rect is attached) by selecting the list in the hierarchy window. Then drag and drop the game objects and picture references to their respective fields.
And that’s it. That’s all you need to do to create a good-looking scrollable list with Unity 3D’s new Canvas UI. You can play with various scroll effects by changing the Movement Type property in the scroll rect.
As you can see from this tutorial, we were able to create a dynamic scrolling list with less than fifty lines of code. Had you tried to create the same thing on a different platform it would have taken a lot more effort.
It is this rapid development capability and robustness that Unity provides that makes it the #1 choice for game developers.
As a leading mobile app development company (iPhone, Android, Windows Phone, HTML5 app development), Folio3 specializes in native app development services and cross platform mobile app development services for the iPhone and iPad. We also offer extensive mobile app testing and QA services. If you have a mobile app idea that you’d like to discuss please or would like to know more about our iPhone app development services, please Contact Us. Learn more about our iPhone, Android and Windows Phone app development services.
USA408 365 4638
1301 Shoreway Road, Suite 160,
Belmont, CA 94002
Whether you are an enterprise aiming to accelerate AI adoption across your organization, an SME looking to scale through intelligent automation, or a startup building AI-powered products from the ground up. We are your trusted partner in driving end-to-end AI transformation and digital growth.
New Customers:
+1 (408) 412-3813
Existing Customers:
+1 (408) 512 1812


COMMENTS ()
Tweet