
Performance testing plays an important role in application’s stability and scalability. We cannot make a
product live without testing its performance, like how much load it can sustain, how well it will perform
under stress when thousands of users will use the application.
We start with defining performance testing and looking at its attributes.
Performance testing is a type of non-functional testing that is used to test the app under expected workload and determine system attributes such as responsiveness and stability under varying workloads.
Speed: It determines whether or not the software product responds rapidly.
Scalability: refers to the maximum load that a software product can manage at any given time.
Reliability: is a factor that determines whether or not a software product is secure; it would work as
expected under workloads.
Load testing:
It evaluates the product’s ability to handle expected user loads. The aim is to determine performance bottlenecks before the software product is publicly released.
Stress testing:
It involves testing a product under extreme workloads to identify the breaking point.
Volume testing:
The goal is to test a product’s performance on a large set of data. Thus the volume in volume testing is the volume of data.
Endurance testing:
It’s done to make sure the software can handle the load for a long period of time.
Scalability testing:
Scalability refers to a maximum load a software product can handle at a given time. It helps in planning capacity addition to your software system.

Identify test environment – Best approach is to use the replica of the production environment so that our test execution and results will be close to the production. By replica of prod I mean it should have the same volume of data, same hardware resources and same configurations so that our results are more accurate and reliable.
Determine performance criteria: what is the expected load of the app? What could be the maximum load of the app Sustainability? Which are the most used features? Where is the most traffic?
Where do we want to go? These are the few things which help in determining the performance criteria.
Plan and Design: Plan your tests now. How will I be creating my test plans/scripts? Identify scenarios. Any pre-requisite I need to design my test plans and design the flows and scenarios
Implement test design: After planning and designing the test in the previous step we now have to just implement that. Create scripts and validate those before actually running the tests; running the performance tests.
Run Tests: When validation of the test design/test scripts is successful then we will run our tests against
the specified number of users (the performance criteria we already identified in the above phase).
Analyze and retest: Analyze the results, response time, throughput, success/error rate etc. and then retest in case the results of the first cycle were not as per the expectations.
The Apache JMeter application is open source software, a 100% pure Java application designed to load
test functional behavior and measure performance. It can be used for analyzing and measuring
performance of APIs and server side performance testing.
1. Install Java 1.8 or above
2. Download Java Link: https://www.oracle.com/java/technologies/javase-downloads.html
3. After installation is finished, you can verify the installation by following the steps mentioned below.
Steps:
1. In Window/Linux, go to Terminal
2. Enter command java -version
3. If the Java runtime environment is installed successfully, you will see the output as:

• Download Jmeter : https://jmeter.apache.org/download_jmeter.cgi
• Extract the zip file and navigate to JMeter > Bin > Click on ApacheJMeter Windows Batch File
Note: Download the Executable JAR file from Jmeter if not found in the Jmeter directory

When you perform above installation steps you will be able to see this window of JMeter where you will be implementing your test scripts as per the 5th step of our performance testing process i.e. Implementation of test scripts.

Below are the most essentials elements of Jmeter which are required in almost all of the test plans for determining the load of the users, to determine specific types of requests to the server and for better viewing the results in a user friendly window so that we can share the insights with our customer as well and can improve our product.
Thread group: It is an important feature of JMeter that allows you to specify the number of users and the time it takes to load all of the users in a thread group. We define Number of Threads in a thread group as (Number of users connecting to the target website, Loop Count: (Number of times to execute the test), JMeter uses the ramp-up duration to determine how long it will take to “ramp-up” to the full number of threads.
Samplers: JMeter uses samplers to send particular sorts of requests to the server; thread groups use samplers to determine which type of request they need to submit. Some of the most frequently used samplers are HTTP request, FTP request, JDBC request..
Listener: A listener is a component that shows the results of the samples. The results can be shown in a tree, tables, graphs or simply written to a log file.
Create a Performance Test Plan in JMeter: Let’s take a website as an example and analyze the performance of the website.
Prerequisite:
Website URL: https://www.google.com/
Go to the above website and test and analyze the performance using Jmeter essential elements.
The performance flow will be as below:

1. Start JMeter
2. Right click on test plan and add a thread group as shown in the image below:

Once it is added, configure the thread group as follows:
Number of Threads: 100
Loop Count: 10
Ramp-Up Period: 0

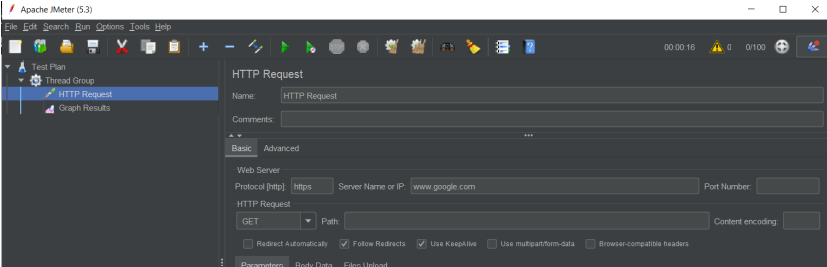
Since our request is an HTTPS request so we will add an HTTPS Sampler in our test plan:

Now we will add the website URL in the sampler as shown below:
Protocol: https
Server Name or IP: www.google.com

Click on the Run button to analyze the results and performance of your website as shown in this image

USA408 365 4638
1301 Shoreway Road, Suite 160,
Belmont, CA 94002
Whether you are a large enterprise looking to augment your teams with experts resources or an SME looking to scale your business or a startup looking to build something.
We are your digital growth partner.
Tel:
+1 408 365 4638
Support:
+1 (408) 512 1812


COMMENTS (0)
Tweet