

Hello guys,
In the first part of the tutorial we learned about Messages framework with which we can develop applications for Messages App, we also created our first iMessage app which was a Sticker Pack application without writing a single line of code, awesome. If you haven’t seen that then visit this link before moving forward.
But there are certain scenarios where a simple Sticker Pack Application cannot be enough, lets discuss a few of them.
If you want to achieve any of these functionalities or related functionality then simple Sticker Pack application template is not for you and you need to use iMessage App template which allows these things to be done using code. We will create one such application shortly and will try to achieve point 1 in above mentioned list.
The app that we created previously was holding all stickers in a flat grid layout and user needs to find the sticker by scrolling through the stickers. Now imagine we have a lot of sticker then it will be very difficult for user to search through them. So, today we will try to customise our grid layout a little so that it would be easier for user to search through stickers in our app.
Therefore we will be adding sections in our app and each section will have similar stickers in it. We will also give user option to add or remove sections by pressing chevron and selecting sections of his choice.
So without any further delay lets start doing this, first we will create a new project by going through File->New->Project in Xcode 8. Now since we want to customise our sticker application therefore select iMessage Application type and Press Next. Give it a name of FoodDrawer and also make sure that Swift language is selected then click Create. We will be calling this app FoodDrawer because it will hold stickers of food items.


Now then, we see two folders in our project, one is named as FoodDrawer and other is named as MessagesExtension. MessagesExtension is the additional folder that is created when iMessage Application template is selected.
FoodDrawer folder contains info.plist and Assets.xcassets file which you will user to provide all the app icons that our app will require to display on different places like settings, spotlight and notifications etc.
MessagesExtension folder holds all the files that we would like to work on to create our custom sticker application. It contains following files.

Now we need a class that will hold our stickers and will show it to user in a grid layout but divided into sections. Therefore we need to use collection view controller for this because we will be adding custom sections in our grid layout.
So lets create one, Right click on MessagesExtension folder and click on New File. Select Cocoa Touch Class from Templates and press Next. Now enterFoodDrawerCollectionViewController as class name which will be the subclass of UICollectionViewController. Select Swift as programming language as we will be using swift through out this application. Now create this file in MessagesExtension folder.
Since this class is subclass of collection view controller therefore we need to implements collection view’s data source methods here, but for implementing data source methods we need stickers data and that information could come from server if we would be making an application that gets all the stickers from a server and displays it to user at run time. But for the simplicity of this demo app we will not be getting data from server but from a .plist file. So lets add this file in our project first and then we will talk about it.
Right click on MessagesExtension folder again and click on New File and then select Property List type file in Resources section as shown below.

Click Next and then give you file name FoodDrawerData and click Create. Now you will have an empty .plist file which has dictionary at its root. Lets add some sticker information in it now that we will be using to show stickers to our users.
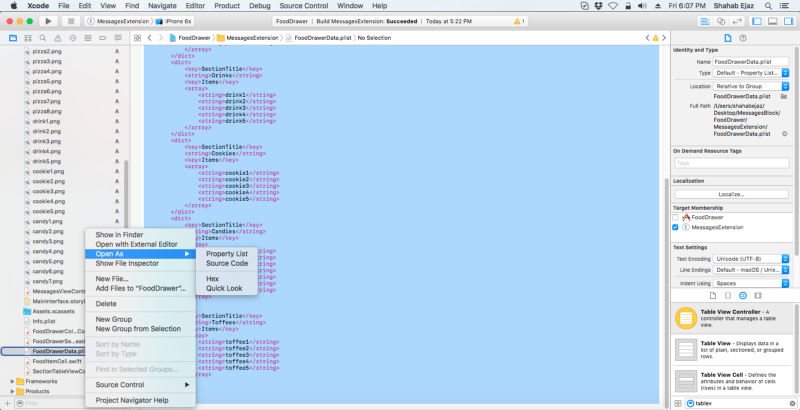
For this right Click on FoodDrawerData.plist file and hover on Open As and then select Source Code option. You will see xml of your empty .plist file. Now remove <plist></plist> tags and information in it and replace it by the content below.
<plist version="1.0">
    <dict>
        <key>Sections</key>
        <array>
            <dict>
                <key>SectionTitle</key>
                <string>Cakes</string>
                <key>Items</key>
                <array>
                    <string>cake1</string>
                    <string>cake2</string>
                    <string>cake3</string>
                    <string>cake4</string>
                    <string>cake5</string>
                    <string>cake6</string>
                </array>
            </dict>
            <dict>
                <key>SectionTitle</key>
                <string>Pizzas</string>
                <key>Items</key>
                <array>
                    <string>pizza1</string>
                    <string>pizza2</string>
                    <string>pizza3</string>
                    <string>pizza4</string>
                    <string>pizza5</string>
                    <string>pizza6</string>
                    <string>pizza7</string>
                    <string>pizza8</string>
                </array>
            </dict>
            <dict>
                <key>SectionTitle</key>
                <string>Drinks</string>
                <key>Items</key>
                <array>
                    <string>drink1</string>
                    <string>drink2</string>
                    <string>drink3</string>
                    <string>drink4</string>
                    <string>drink5</string>
                </array>
            </dict>
            <dict>
                <key>SectionTitle</key>
                <string>Cookies</string>
                <key>Items</key>
                <array>
                    <string>cookie1</string>
                    <string>cookie2</string>
                    <string>cookie3</string>
                    <string>cookie4</string>
                    <string>cookie5</string>
                </array>
            </dict>
            <dict>
                <key>SectionTitle</key>
                <string>Candies</string>
                <key>Items</key>
                <array>
                    <string>candy1</string>
                    <string>candy2</string>
                    <string>candy3</string>
                    <string>candy4</string>
                    <string>candy5</string>
                    <string>candy6</string>
                    <string>candy7</string>
                </array>
            </dict>
            <dict>
                <key>SectionTitle</key>
                <string>Toffees</string>
                <key>Items</key>
                <array>
                    <string>toffee1</string>
                    <string>toffee2</string>
                    <string>toffee3</string>
                    <string>toffee4</string>
                    <string>toffee5</string>
                </array>
            </dict>
        </array>
    </dict>
</plist>
If you have correctly added the above code then by again right clicking on FoodDrawerData.plist and selecting Property List option in Open As, you will see the property list with sticker data that we will use as shown below.
You can see that right under Root, there is an array named Sections which holds all the sections in an array that our app will show. Each section in array is of type dictionary and has SectionTitle key which tells the name of the section and Items key which is an array and holds sticker names in each section.
Now lets come back to FoodDrawerCollectionViewController and replace viewDidLoad with code below.
override func viewDidLoad() {
        super.viewDidLoad()
        self.collectionView?.contentInset = UIEdgeInsets(top: 0, left: 0, bottom: 40, right: 0)
        if let path = Bundle.main.path(forResource: "FoodDrawerData", ofType: ".plist") {
            let dict = NSDictionary(contentsOfFile: path) as! Dictionary<String,AnyObject>
            let allSections = dict["Sections"]
            if let selectedSections = UserDefaults.standard.array(forKey: "selectedSections") as? [Int] {
                for index in selectedSections {
                    self.data.append((allSections?[index])! as! Dictionary<String, AnyObject>)
                }
            }
        }
    }
Here you can see that we have loaded stickers data from our .plist file in a dictionary named dict, we will only use those sections from this dictionary that we have allowed user to see in app by default. These section indexes are stored in UserDefaults and are set first time when app is launched inMessagesViewController. Add below code to make it working.
 override func viewDidLoad() {
        super.viewDidLoad()
        let userDefaults = UserDefaults.standard
        if userDefaults.array(forKey: "selectedSections") == nil {
            let selectedSections:[Int] = [0,1]
            self.update(selectedSections: selectedSections)
        }

    }
 private func update(selectedSections:[Int]) {
        let userDefaults = UserDefaults.standard
        userDefaults.set(selectedSections, forKey: "selectedSections")
        userDefaults.synchronize()
    }
By Default we have added two sections in user defaults therefore user will only be able to see first two sections of our sticker app. These two section are then added in an array called data, but you will be receiving an error because data property is not yet defined. So lets add this property and some other as well. Add following code in FoodDrawerCollectionViewController on top ofviewDidLoad() method.
    let numberOfItemsPerRow = 3.0 as CGFloat
    let interItemSpacing = 1.0 as CGFloat
    let interRowSpacing = 1.0 as CGFloat
    let sectionTitleKey = "SectionTitle"
    let sectionItemsKey = "Items"
    var data = [Dictionary<String,AnyObject>]()
Here you can see some constant properties that we will be using for laying out our collection view later. There is also a property named data which holds an array of dictionaries of type String as Key and AnyObject as Value.
Now we have got data, its time to implement data source methods of collection view.
Replace UICollectionViewDataSource’s stub methods with the following implementation.
// MARK: UICollectionViewDataSource
    override func numberOfSections(in collectionView: UICollectionView) -> Int {
        return data.count
    }

    override func collectionView(_ collectionView: UICollectionView, numberOfItemsInSection section: Int) -> Int {
        return (data[section][sectionItemsKey] as! NSArray).count
    }

    override func collectionView(_ collectionView: UICollectionView, cellForItemAt indexPath: IndexPath) -> UICollectionViewCell {
        let cell = collectionView.dequeueReusableCell(withReuseIdentifier: reuseIdentifier, for: indexPath)
        return cell
    }

    override func collectionView(_ collectionView: UICollectionView, viewForSupplementaryElementOfKind kind: String, at indexPath: IndexPath) -> UICollectionReusableView {
        let headerView = collectionView.dequeueReusableSupplementaryView(ofKind: kind, withReuseIdentifier:String(FoodDrawerSectionHeaderView.self), for: indexPath)
        if let foodHeader = headerView as? FoodDrawerSectionHeaderView {
            let section = self.data[indexPath.section]
            let sectionTitle = section[sectionTitleKey] as! String
            foodHeader.configure(usingTitle: sectionTitle)
        }
        return headerView
    }
Now if you build it, you will receive an error as shown below.

This is due to the file FoodDrawerSectionHeaderView which we haven’t included in our project yet, so lets include it.
Right click on MessagesExtension folder, select New File then click onCocoa Touch Class, select UICollectionReusableView in Subclass and give it the name FoodDrawerSectionHeaderView. Now add the below code in this class.
class FoodDrawerSectionHeaderView: UICollectionReusableView {
    @IBOutlet var sectionTitle: UILabel!
    func configure(usingTitle title:String) {
        self.sectionTitle.text = title
    }
}
Here we are simply setting the title of each section header. As you can see that SectionTitle is a UILabel which we need to bind to SectionHeaderView in storyboard which exactly we will do next.
Now go to the storyboard, add a UICollectionViewController from Object Library, then go to the Identity inspector and set its Custom Class toFoodDrawerCollectionViewController. Also make sure that dataSource and delegate are binded to you FoodDrawerCollectionViewController inConnection inspector.
Now search reusable collection view in Object Library and drag and drop it inside FoodDrawerCollectionViewController’s collectionView. Now set the custom Class of UICollectionResuableView asFoodDrawerSectionHeaderView. Also give it the identifier ofFoodDrawerSectionHeaderView so the we can dequeue it later using this identifier.
Now we will add a label in FoodDrawerSectionHeaderView in storyboard which will show section title. For this add an empty UIView insideFoodDrawerSectionHeaderView component in storyboard, then add aUILabel in that empty view. Set its Trailing, Leading, Bottom and Topconstraint to superview to zero. Now select the attribute inspector of UILabeland set it alignment to center. Now select FoodDrawerSectionHeaderViewand go to the section inspector and bind it to your UILabel to titleLabel.
While we are in storyboard we need to do one more thing, we need to add sticker View inside our UICollectionViewCell. For this add an empty UIViewinside UICollectionViewCell. Set its Trailing, Leading, Bottom and Topconstraint to superview to zero. Now set its Custom Class to MSStickerView. Now Select UICollectionViewCell and open Attribute inspector and set its identifier as Cell. Then go to the Identity Inspector and set FoodItemCell as its Custom Class. We have not added FoodItemCell class yet and thats what we are going to do next, but before that just see the screen shot below to match it with your storyboard layout.

Now lets move forward and add class for our UICollectionViewCell. For this again right click on MessagesExtension folder, click on New File, selectCocoa Touch and add a file named FoodItemCell subclass ofUICollectionViewCell. Then add the following code snippet in it.
import Messages
class FoodItemCell: UICollectionViewCell {
    @IBOutlet weak var stickerView: MSStickerView!
    func configure(usingImageName imageName:String) {
        guard let imagePath = Bundle.main.path(forResource: imageName, ofType: ".png") else {
            return
        }
        let path =  URL(fileURLWithPath: imagePath)
        do {
            let description = NSLocalizedString("Food Sticker", comment: "")
            let sticker = try MSSticker(contentsOfFileURL: path , localizedDescription: description)
            stickerView.sticker = sticker
        }
        catch {
            fatalError("Failed to create sticker: \(error)")
        }
    }
}
Here you can see we have defined a property named stickerView. You have to bind this property in storyboard with the MSStickerView that we just created in storyboard above.
If you run project now, you will see that it is successfully build but still nothing is loaded on screen. So lets fix it now. Add the below code to load FoodDrawerCollectionViewController’s instance in our principal MessagesViewController.
override func willBecomeActive(with conversation: MSConversation) {
    super.willBecomeActive(with: conversation)
    self.present(with: self.presentationStyle)
}

override func didTransition(to presentationStyle: MSMessagesAppPresentationStyle) {
    // Called after the extension transitions to a new presentation style.
    super.didTransition(to: presentationStyle)
    self.present(with: presentationStyle)
}

private func present(with presentationStyle:MSMessagesAppPresentationStyle) {
    // Remove any existing child controllers.
    let viewController:UIViewController
    switch presentationStyle {
    case .compact:
        viewController = UIStoryboard(name: "MainInterface", bundle: nil).instantiateViewController(withIdentifier: String(FoodDrawerCollectionViewController.self)) as! FoodDrawerCollectionViewController
        break
    case .expanded:
        viewController = UIStoryboard(name: "MainInterface", bundle: nil).instantiateViewController(withIdentifier: String(FoodDrawerCollectionViewController.self)) as! FoodDrawerCollectionViewController
        break
    }

    for child in childViewControllers {
        child.willMove(toParentViewController: nil)
        child.view.removeFromSuperview()
        child.removeFromParentViewController()
    }
    // Embed the new controller.
    addChildViewController(viewController)

    viewController.view.frame = view.bounds
    viewController.view.translatesAutoresizingMaskIntoConstraints = false
    view.addSubview(viewController.view)

    viewController.view.leftAnchor.constraint(equalTo: view.leftAnchor).isActive = true
    viewController.view.rightAnchor.constraint(equalTo: view.rightAnchor).isActive = true
    viewController.view.topAnchor.constraint(equalTo: view.topAnchor).isActive = true
    viewController.view.bottomAnchor.constraint(equalTo: view.bottomAnchor).isActive = true

    viewController.didMove(toParentViewController: self)

}
You can see here we are calling present method from willBecomeActive anddidTransition delegate methods.
present method is simply instantiating aFoodDrawerCollectionViewController both in compact and expandedmode and embedding it in our MessagesViewController after removing all other view controllers.
If you have build project with success, you will see that the default first and second section from our plist is successfully loaded but with no stickers as you can see from below image.

Stickers are not loaded because we have not added any images for that yet. Lets add stickers in our app by downloading assets as .zip file from this link.
After downloading .zip file, unzip it and drag and drop Stickers folder inside your app’s MessagesExtension folder. Click on Copy items if needed checkbox and then click Finish. You can see this folder contains all the stickers that we want to show in our FoodDrawer applications.


We have added stickers but we are forgetting one thing, before running your project again, add following delegate method inFoodDrawerCollectionViewController. This methods configures FoodItemCell with the provided sticker image.
// MARK: UICollectionViewDelegate
    override func collectionView(_ collectionView: UICollectionView, willDisplay cell: UICollectionViewCell, forItemAt indexPath: IndexPath) {
        // Configure the cell
        guard let foodItem = cell as? FoodItemCell else {
            return
        }
        let sectionItems = self.data[indexPath.section][sectionItemsKey]
        let imageName = sectionItems?[indexPath.row] as! String
        foodItem.configure(usingImageName: imageName)
    }
Well if you are following me correctly, you will be able to see two default sections named Cakes and Pizzas and the stickers associated with them.

Now then, it seems that our collection view cells are way too small to our liking. So we would like to increase a cell size a bit. We also cannot see sections other than the default sections. Therefore we will also add a way so that user can add or remove different sticker sections from our application.
But first, lets increase the size of the cells. Go to storyboard, click on Food Drawer Collection View Controller, then click Collection View. Go to the Size inspector and then set the Cell size Width and Height to 100.
Run the app again and you will see that now stickers look a little bigger and better.
As we talked earlier, we would to allow users to select different sections from a list and then those selected sections’ stickers will be shown to user inside our iMessage application.
For this, we need to add a new file named SectionTableViewControllerwhich will be the subclass of UITableViewController in MessagesExtensionfolder.
After adding SectionTableViewController, replace the content of SectionViewController with the following code.
class SectionTableViewController: UITableViewController {

    var data = [Dictionary<String,AnyObject>]()
    var selectedIndexes = [Int]()
    override func viewDidLoad() {
        super.viewDidLoad()
        self.tableView?.contentInset = UIEdgeInsets(top: 90, left: 0, bottom: 40, right: 0)
        if let path = Bundle.main.path(forResource: "FoodDrawerData", ofType: ".plist") {
            let dict = NSDictionary(contentsOfFile: path)
            self.data = dict!.value(forKey: "Sections") as! Array
        }
        if let arr = UserDefaults.standard.array(forKey: "selectedSections") as? [Int] {
            self.selectedIndexes = arr
        }
    }

    // MARK: - Table View Data Source
    override func numberOfSections(in tableView: UITableView) -> Int {
        return 1
    }

    override func tableView(_ tableView: UITableView, numberOfRowsInSection section: Int) -> Int {
        return self.data.count
    }


    override func tableView(_ tableView: UITableView, cellForRowAt indexPath: IndexPath) -> UITableViewCell {
        let cell = tableView.dequeueReusableCell(withIdentifier: "cell", for: indexPath)
        return cell
    }


    // MARK: - Table View Delegate
    override func tableView(_ tableView: UITableView, willDisplay cell: UITableViewCell, forRowAt indexPath: IndexPath) {
        cell.textLabel?.text = self.data[indexPath.row]["SectionTitle"] as? String
        if self.selectedIndexes.contains(indexPath.row) {
            cell.accessoryType = .checkmark
        }
    }

    override func tableView(_ tableView: UITableView, didSelectRowAt indexPath: IndexPath) {
        if self.selectedIndexes.contains(indexPath.row) {
            let cell = tableView.cellForRow(at: indexPath)
            cell?.accessoryType = .none
            self.selectedIndexes.remove(at: self.selectedIndexes.index(of: indexPath.row)!)
        } else {
            let cell = tableView.cellForRow(at: indexPath)
            cell?.accessoryType = .checkmark
            self.selectedIndexes.append(indexPath.row)
            self.selectedIndexes.sort(by:<)
        }
    }

}
Here data property holds the sections specified in .plist file, andselectedIndexes holds the section indexes which user selects to show in our app. As we know by default we have added section index 0 and 1 in our application.
So this table shows all the sections that we have specified in our plist and allows user to tick those sections which he wants to show in the iMessage application in compact mode.
As we discussed in first part of the tutorial that iMessage application has two modes, compact and expanded, and whenever user clicks on chevron, app goes into expanded mode and when its clicked again, app comes back intocompact mode, and we also get notified for change in presentation style in our principal MessagesViewController through willTransition anddidTransition to methods. We can use these methods to change our presented view controller. In our case we will embedSectionTableViewController when user moves to expanded presentation style and will go back to FoodDrawerCollectionViewController when user goes back to compact presentation Style.
Lets make it working now by adding this switching logic in our MessagesViewController’s transition methods. update following methods with below code in MessageViewController.
override func willTransition(to presentationStyle: MSMessagesAppPresentationStyle) {
    // Called before the extension transitions to a new presentation style.
    super.willTransition(to: presentationStyle)
    if presentationStyle == .compact {
        let sectionsViewController = self.childViewControllers[0] as! SectionTableViewController
        self.update(selectedSections: sectionsViewController.selectedIndexes)
    }
}

override func didTransition(to presentationStyle: MSMessagesAppPresentationStyle) {
    // Called after the extension transitions to a new presentation style.
    super.didTransition(to: presentationStyle)
    self.present(with: presentationStyle)
}
We also need to update our present method’s switch case. In case of expanded presentation style, We would like to showSectionTableViewController. Therefore update the switch case with following code inside present method.
switch presentationStyle {
    case .compact:
        viewController = UIStoryboard(name: "MainInterface", bundle: nil).instantiateViewController(withIdentifier: String(FoodDrawerCollectionViewController.self)) as! FoodDrawerCollectionViewController
        break
    case .expanded:
        viewController = UIStoryboard(name: "MainInterface", bundle: nil).instantiateViewController(withIdentifier: String(SectionTableViewController.self)) as! SectionTableViewController
        break
}
Now the only thing left is to create SectionTableViewController in storyboard.
So open up the storyboard and add a Table view controller. Go to Identity Inspector and set its class to SectionTableViewController, also give it theStoryboard ID named SectionTableViewController. Now select Table Viewand then select cell and give it an identifier named cell in Attribute Inspector.
If everything is fine and project runs successfully. You should see default sections on app launch and you can also add or remove sections by clicking on chevron and launching SectionTableViewController in expanded style. Then selecting desired sections and clicking back the chevron to back to FoodDrawerCollectionViewController with selected section stickers visible in compact presentation style.

There is a lot more that you can do with this app and iMessages extensions in general. Hopefully you would have enjoyed this quick tutorial and would have learnt something out of it.
USA408 365 4638
1301 Shoreway Road, Suite 160,
Belmont, CA 94002
Whether you are a large enterprise looking to augment your teams with experts resources or an SME looking to scale your business or a startup looking to build something.
We are your digital growth partner.
Tel:
+1 408 365 4638
Support:
+1 (408) 512 1812


COMMENTS (0)
Tweet