

What if your users could talk to your app? Sounds incredible, right? With iOS 10 that is now possible because with the Sirikit in iOS 10 you can now overcome the communication barrier between your app and its users.
SiriKit allows users to interact with content and services offered by iOS 10 apps using their voice. It does so via intent domains.
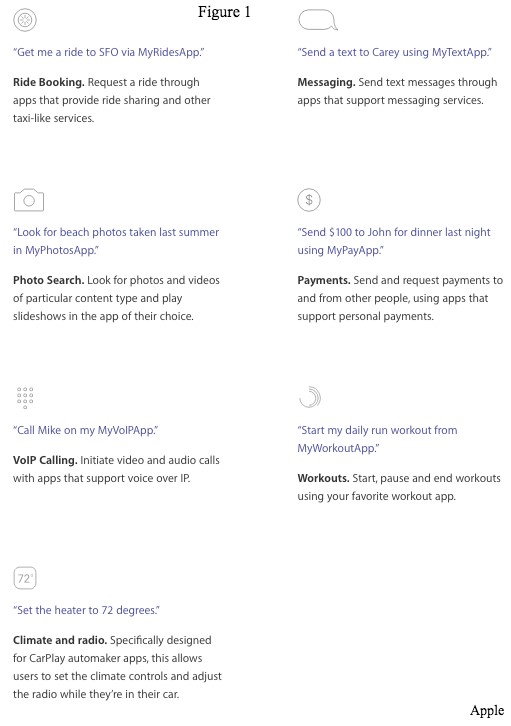
SiriKit provides support for some intent domains, which define specific tasks that can be performed using Siri. These tasks are known as intents (because they represent the intentions of the user) and each intent is represented by a custom class whose properties contain information related to the task. To use SiriKit, your app must belong to one of the supported intent domains (See Figure 1).
Click to read more about intent domains.
To implement application extensions SiriKit provides two different frameworks.
In order to use Sirkit, you must add the following two extensions to your app.
To see how SiriKit works and how you can use it in your iOS apps, have a look at the tutorial below.
Getting Started with Siri Kit
1. Create a new iOS application.
2. Go to File > New > Target > Intents Extension>

3. Enter a name and click Finish.

4. Now add Linked Framework core location

Now build the app target by selecting the app MyMusic from the Scheme dropdown, and with the target device set to your test iOS device, press the Build & Run button.
You will see a blank screen. Don’t worry. This is because we haven’t created our screens yet (screens are not the part of this tutorial btw).
In the background your extensions will also be loaded into the device’s file system. Now you can close your app using the Stop button in Xcode.
Next, switch your scheme to select the Intent target, and press build & run again.
The will prompt you asking for which app to attach to. Just select the app you just ran, MyMusic. This will present the MyMusic app again on your device (with a white screen/blank app most likely), but this time the debugger will be attached to the Intent extension.
For now, just exit the app by clicking the home screen.
The extension should now be in place but as the iOS device user you may still may need to enable the extension in your Siri settings. So on your test device enter the Settings app. Select the Siri menu, and near the bottom you should see MyMusic listed as a Siri App.
Now let’s interact with our Application using Siri.
“Hey Siri”
“Send a Message using myMusic”

And that’s it! Congratulations, you have just built a connection with Siri using the Getting Started with SiriKit tutorial. Stay tuned for my next tutorial about SiriKit.
USA408 365 4638
1301 Shoreway Road, Suite 160,
Belmont, CA 94002
Whether you are a large enterprise looking to augment your teams with experts resources or an SME looking to scale your business or a startup looking to build something.
We are your digital growth partner.
Tel:
+1 408 365 4638
Support:
+1 (408) 512 1812


COMMENTS (0)
Tweet